


Before man was, gardening waited for him. The ultimate trade awaiting its ultimate practitioner.
Ok fine, Cormac McCarthy was actually talking about war when he wrote that, but if you ask me, it still holds true for gardening.
Along with mastering fire, the purposeful cultivation of plants is widely considered to be one of the technological leaps that set humans on the path to complex civilization, for better or for worse. Speaking as a city dweller and inhabitant of the current iteration of said complex civilization, we need gardening now, more than ever, to smooth out some of the rougher edges of this weird world we’ve built for ourselves.
Gardening can be a great way to relax and free your mind from the numbing pressures of The Screen. Futzing around with plants in the sun helps us reconnect with the glories of the natural world that we’ve become increasingly isolated from. And, as this bizarrely dark listicle puts it, gardening “reminds us of the cycle of life,” and thus helps us “come to terms with that most universal of anxieties: death.”
But hey, let’s not worry about that just yet. The tall, skinny guy with the scythe and black robes comes for us all, but until he rings the buzzer, let’s squeeze all the joy we can out of the here and now.
Which brings us back to gardening, and how to get into it.
For those of us who live in the suburbs or, even better, the country, the process is easy: go outside and plant some seeds in the ground, then watch them grow. For those of us living in a city, it’s a bit more complicated.
But fear not. I have toiled for countless hours and spent thousands of dollars to thread that needle, so you don’t have to. After four years of banging my head against the wall in an attempt to garden despite living in a tiny apartment in Brooklyn, New York, I have finally figured out a design that is relatively simple, works well, and, most importantly, is extremely low-maintenance once it’s set up.
As long as you have rooftop access and a relatively chill landlord, there’s an excellent chance you can learn from my mistakes and build yourself a rooftop garden. It should only cost you a few hundred bucks and a weekend or two of your time—even less if you’ve already got spare materials lying around and are capable of getting out of bed before 1 p.m. on the weekend.
It’s really just three things
There are an endless variety of ways to garden on a roof, but my setup consists of three components intended to address what I consider to be the three main problems confronting the would-be rooftop gardener.
If you’re just starting out and all that seems overwhelming, you can halve the time required to put this together by foregoing the custom soil mix and simply adding organic fertilizers to store-bought potting soil (only bags marked as “potting soil,” no “in-ground” or “raised bed” stuff, as it’s much heavier and will not distribute water properly). This will work fine, but not as well as mixing it up from scratch.
It should go without saying, but definitely ask your landlord for permission before building a rooftop garden, and make sure the roof in question has the structural integrity necessary to support one. Most apartment building roofs shouldn’t have a problem supporting at least a small garden, but you do need to scope it out first. If in doubt, ask your landlord.
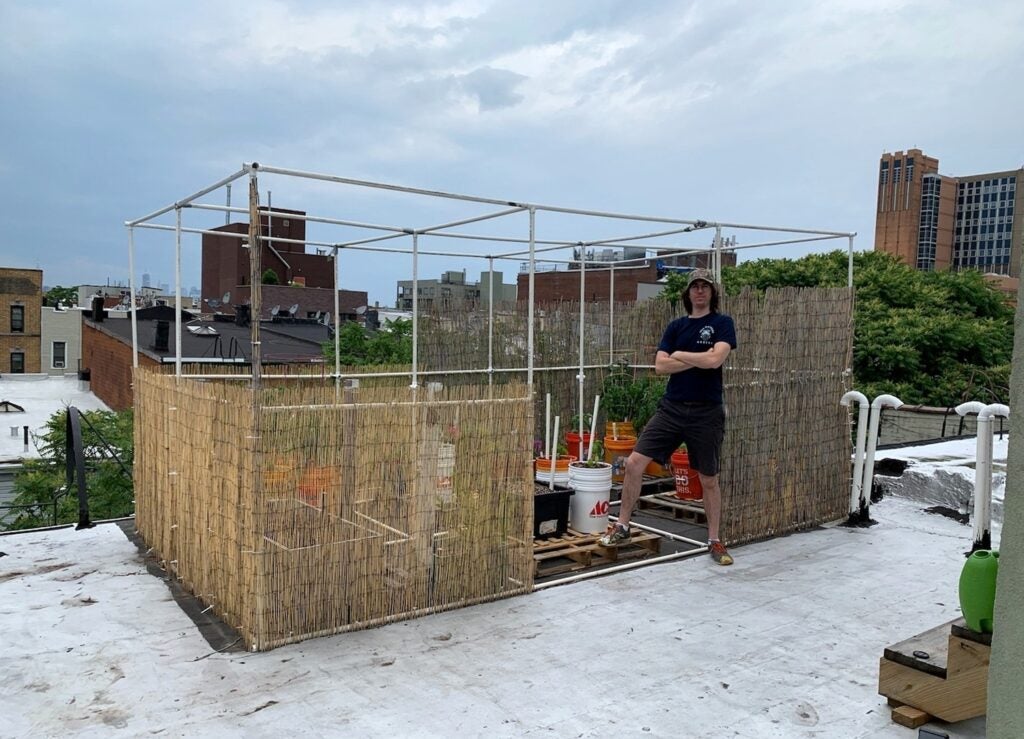
Build the structure
This part can seem intimidating, but it’s actually fairly straightforward, as long as you think ahead.
First, decide where you want your garden to go. Measure the area, and plan the size of your structure accordingly.
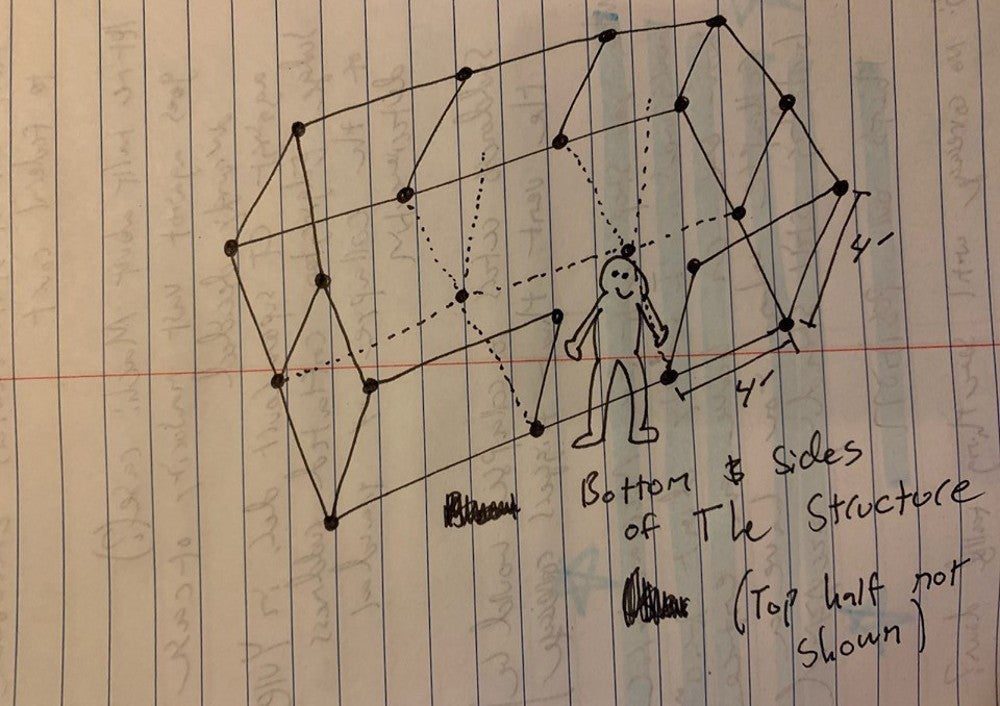
Mine, for example, is 12 feet long, 8 feet wide, and 8 feet tall. Your length and width may vary, but I recommend a simple square or rectangle with 8-foot-tall sides to keep the wind from roughing up your plants. You’ll also want to leave an opening on one side so you can get in and out.
Sketch a rudimentary blueprint (no need to get fancy with this), then figure out how much PVC pipe and bamboo fencing you’ll need. Remember that you won’t require horizontal pieces of pipe on the interior—you’ll need space to walk around—and that you’ll keep the entryway clear of fencing.
What you’ll need:
The materials listed below are standardized for one 4-by-4-by-8-foot section of garden space, which is the basic building block of my design. As you add square footage, you’ll need slightly fewer pieces for each additional section, as they will share poles and joints.
Materials (for one 4-by-4-by-8-foot block of garden space)
- 18 or so 4-foot-long, 3/4-inch-thick PVC poles (about 12 for each additional block)
- 12 PVC pipe joints (your combination of tee joints, 3-way connectors, 4-way connectors, and 5-way connectors will vary depending on the size of your structure)
- 12 feet of bamboo fencing (4 feet for each additional edge block)
- A can of PVC cement
- A roll of string (or about 100 zip ties)
Tools
- Hacksaw (or PVC pipe cutter)
- Knife (or scissors)
- Permanent marker
Once you’ve got your tools and materials, measure the pipe to your desired length, mark it, cut it, and start connecting. It’s OK to be a little confused during this step, but once you put a few pieces together it should begin making sense pretty quickly. When everything looks good, go back and glue all the joints together with the PVC cement.
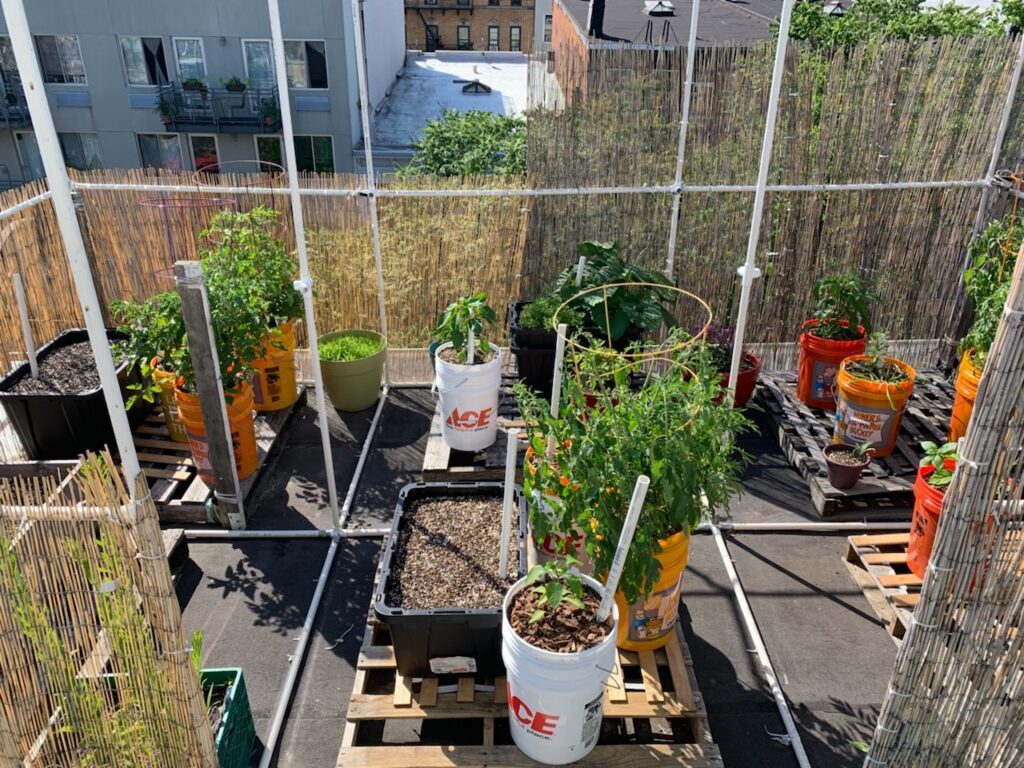
Once your frame is complete, wrap the bamboo around it and secure the fencing with zip ties or string. This may take an hour or two, but it’s worth going slow and doing a thorough job. Your plants and neighbors will thank you the next time a storm rolls through. Tie the corners to something heavy to prevent your garden from flying away—wooden pallets work well if you’re using those to support your plants, but you can also anchor the structure to the handles of your planters.
Craft the self-watering containers
There are many ways to build self-watering containers, but the basic idea is this: each one has a built-in, refillable water reservoir and a wicking mechanism that brings that water up into the soil.
And while this how-to deals with 5-gallon buckets, it’s easy to extend the underlying principles to larger containers and other types of materials once you get the hang of things.
What you’ll need:
Materials (for one container)
- 2 plastic 5-gallon buckets (cheaper in bulk)
- 2 sponges
- 3 strips of foot-long cotton material (one t-shirt will make enough for about a dozen containers, but it must be 100% cotton—synthetic material doesn’t wick properly)
- A 3-foot length of 3/4-inch PVC pipe
- A large funnel (you only need one, no matter how many containers you have)
- A wooden pallet or something else to elevate the planter (optional)
Tools
- Drill
- 1-inch drill bit
- 1/4-inch drill bit
- Permanent marker
- Scissors (or a boxcutter)
So, you’ve got two buckets. Put one inside the other and measure where the bottom of the inside bucket reaches on the outside bucket. Mark that spot with your marker, then draw a little circle a half-inch below that. Separate the buckets and drill a 1/4-inch hole within the circle you marked on the outside one, then set that bucket aside.
Now take the other bucket, flip it upside-down and drill a 1-inch hole in the middle of its bottom. Drill another 1-inch hole near the outside of the bottom. Now drill a dozen or so 1/4-inch holes all around.
Now, take two sponges and use a knife or scissors to cut a 2-inch-long gash in the center of each sponge. Take your cotton strips and thread them through one sponge, so about 4 inches of material sticks out the other side.
Stuff that material through the big hole in the center of the inside bucket so the sponge and the majority of the fabric remains within the bucket. Take the other sponge, place it on the outside of the bucket, and thread the dangling strips through it, making sure it’s snug against the bottom of the bucket. These pieces of cloth will wick water from the reservoir into the soil, and the sponges will ensure they stay in place.
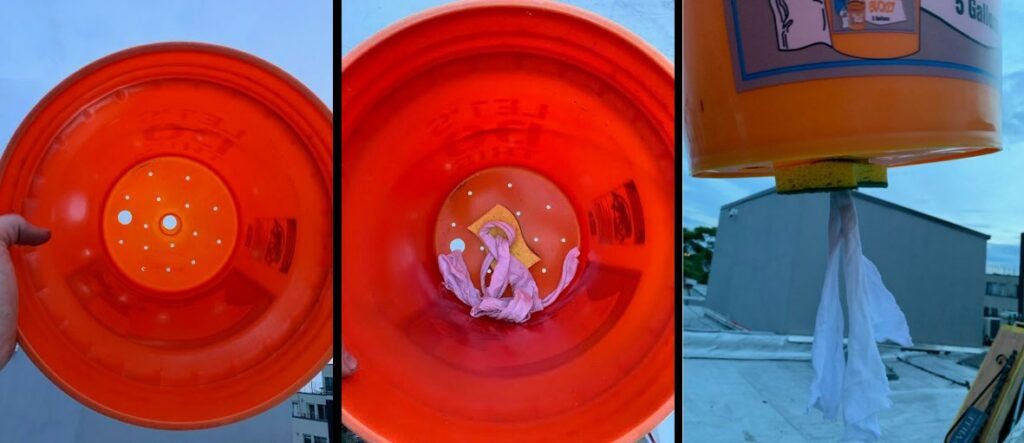
Now put the inside bucket back into the outside bucket. Jam the 3-foot length of PVC pipe into the other 1-inch hole. With the aid of the funnel you’ll use this pipe to fill the reservoir.
When you eventually load the inside bucket with soil, try to make sure that the cotton strips extend upward to ensure even water distribution throughout the soil mixture. I’ll usually fill it one-third of the way with dirt, lay one strip across that layer, add the next third and do the same thing with another strip, then try to bury the remaining strip just below the surface.
For you visual learners, this video directly inspired my container design and it’s a great way to see the process play out.
When putting the buckets in your garden, it’s best to place them on top of something to keep them from sitting directly on the roofing material. This will ensure proper drainage and prevent roof damage from any water trapped under the containers. I used wooden pallets, but pretty much anything that provides a bit of elevation will work just fine.
You should only need to fill your containers with water once or twice a week, depending on the size of the plants they hold and how much it has rained.
Mix the soil
You want your soil to be equal parts compost, vermiculite, and sphagnum moss—the amounts below are approximate.
Vermiculite and the moss are usually sold in bags of 1-3 cubic feet—more than enough for a single container. To save you the conversion time: one 5-gallon bucket holds about 0.7 cubic feet of material, so you’ll need a little less than 0.25 cubic feet of each (or about 1.5 gallons).
Compost is the most important element, and you can find the good stuff at nearby community gardens or composting operations. You can make your own, too, but it might be hard to produce enough if you’re building a large garden. Still, never settle for the store-bought stuff.
For best results, it helps to sift the compost and moss to filter out any large chunks. Doing so helps ensure even water distribution throughout the soil, but if you’re tired and just want to get to the actual gardening, you can skip this step without too much worry.
What you’ll need:
Materials (for one container)
- 1/4 cubic foot of vermiculite
- 1/4 cubic foot of sphagnum moss
- 1/4 cubic foot of compost
- 3 tablespoons of Azomite
- 3 tablespoons of kelp meal
- 3 tablespoons of all-purpose fertilizer
- A large tarp
- 3 tablespoons of worm castings (optional)
Tools
If you’re not going to sift, simply dump the proper amount of each material onto your tarp. If you’re mixing soil for multiple containers, simply scale it up—your only limits are tarp size and how hard you want to work. If you’ve got a large container to mix in, that works, too, but a tarp is probably more practical for most apartment-dwellers.
Sprinkle kelp meal, all-purpose fertilizer, worm castings (if available), and Azomite on top. I usually use about 1 cup for six buckets worth.
Now mix it all up. Don’t half-ass it.
I had to pick out a bunch of worms during this process, so if your compost is also full of ‘em (which means the compost is healthy), keep them safe. Just put a little bit of compost in a small container, stash the worms in there, and then either release them into soil somewhere, or return them to wherever you got your compost. Unfortunately, the conditions inside your containers will probably not be optimal for worm survival, and a bunch of dead worms in your containers could lead to fungus or disease problems down the line.
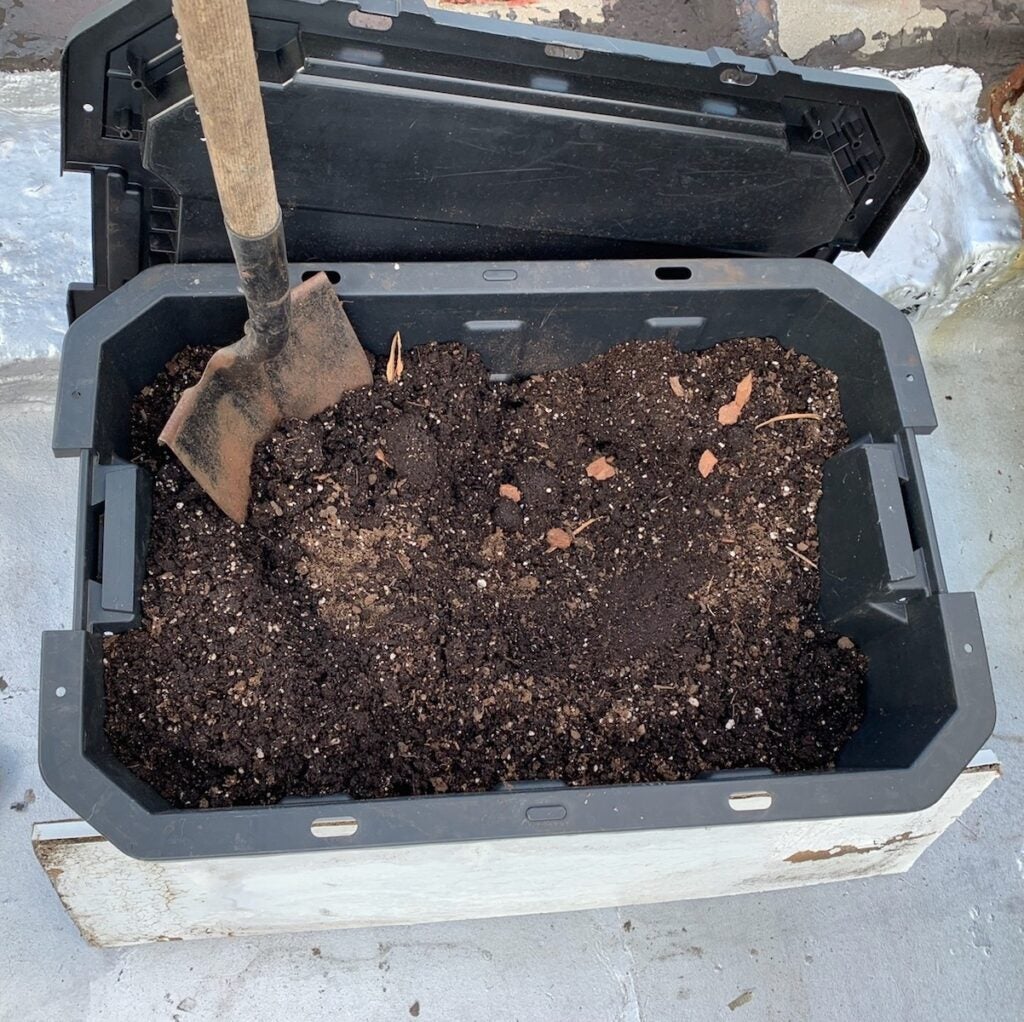
When your soil is well-combined, put it in your containers.
If you want to sift the compost and moss, you’ll need to build a sifter.
What you’ll need:
Materials (for the sifter)
- 2 2-foot-long 2-by-4s
- 2 4-foot-long 2-by-4s
- A piece of 1/4-inch mesh (at least 4 feet long and 2 feet wide)
- 1.5-inch screws
Tools
- Cutting pliers
- Drill
- Staple gun
Make a rectangle with your 2-by-4s and screw the corners together. Cut a length of mesh to fit over it all, letting the edges overlap the wooden frame so you can fasten it in place. Then, staple it tightly to the wood with the staple gun.
Place the sifter above your tarp by putting it on top of two chairs, boxes, tables, or whatever you have that’ll keep it elevated. Dump the compost into the sifter, then rub it around with your gloved hands until most of it has fallen through. Put any large bits into another container and set it aside.
Now do the same with sphagnum moss. You don’t have to sift the vermiculite.
This video is a great way to see what the process looks like.
As you get more into it, I’d recommend experimenting with liquid fertilizers to give your plants some extra oomph, but the nutrients in this mixture should be more than enough to get you, and your plants, started.
Now get out there and get gardening, and remember this: even though a man’s at odds to know his mind because his mind is aught he has to know it with, as long as you’re gardening you won’t need to trouble yourself with all that. Just stand among the screaming leaves and call down the lightning, and know that the time has come for you to reap.


